Project - IoT Door System
Mobile App Development Assignment (IoT)
Below is the opening paragraph of the assignment I will be working on, luckily it is quiet open without specified technologies to be used, which will allow me to build a complex back-end system in NodeJS with the use of MongoDB as the database technology of my choice.
This assignment involves the use of Mobile Device Development, Sensors and Location Awareness, and the Internet of Things. The idea is to develop a system to interact with some sensors and output devices; to interact with them via the Internet using a mobile device and server, and to show an understanding of the design of systems for the Internet of Things.
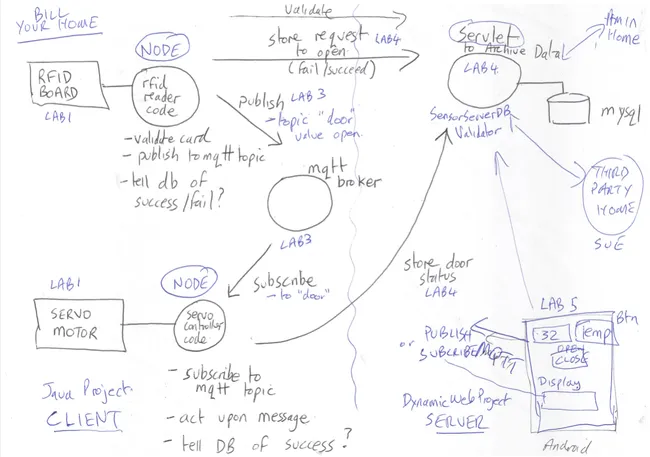
This is a rough diagram that we were given of how the system would interact and how we should build it, having three main tasks to complete:
- IoT Devices (Servo & RFID): Connecting to a MQTT Broker (separately)
- Server / DB: Interact with the IoT Devices via the Broker and store values (logging usages, both successes and failures), verify RFID tags trying to unlock the Servo (Door) from stored values in the DB.
- Android App: Allow the user to unlock the Servo, view logs and be notified when there is an attempt to unlock the Servo
As shown in the diagram it is suggested the the Android App connects to the MQTT Broker, to directly be able to unlock the Servo, although I have built my own diagram which will deviate from this.
My thought behind this is to increase security, since there will need to be a network connection even if it connects to the Broker, but now it will only be handled via the server. Also, if the Broker is changed, it will only need to be updated on the server (via the Android App), rather than directly on the App and Server.

This is how I plan to implement the required tasks for the assignment, being the second iteration after my initial draft I posted on Twitter.
Schedule
Below is a rough order of what I plan to do in relation to aspects of my diagram:
- DB Tables / Collections Diagram
- API End-points
- Server Set-up
- Server MQTT Set-up
- MongoDB Set-up
- Clients (Phidget Devices)
- Android Layout Design
- Android App
- Firebase Cloud Messaging (*a form of Push Notifications)
DB Tables / Collections
Looking at the interactions I will need and data that will be stored, here are the rough collections (tables / columns below) and documents (properties / rows) that are to be implemented:
| Users | Devices | Tags | Logs |
|---|---|---|---|
| ID | ID | ID | Device ID |
| Username | User ID (Belongs) | Device ID | Type (Val/User) |
| Password | Name (For User) | Type (Val/User) | Value/Username |
| Access Token | Broker | Value Accepted | Access/Failure |
| Username? (Broker) | Timestamp | ||
| Password? (Broker) | |||
| Topic | |||
| Type (pub/sub) |
I could use some form of Oauth / Google Sign-up to save having to store passwords, since their services will be much more secure, although there are many feature I could include which will be too much overhead for a project of this small size, but is something to be considered.
The database itself can be hosted via Mongo and can have only the server I'm running my code on whitelisted, which will increase security either way and the users password will be hashed likely via SHA-256 or other secure/trusted algorithm.
API End-points
Now that I have defined my database schema, I can now think of what API calls the Android App will need to use to interact with the Server, which will then be implemented via NodeJS and routes.
All successful responses will have a code of 200, responses below referring to the content, if the Data Params are not passed for all but the Sign Up call, the code will be a 422 (Unprocessable Entry), or if they are incorrect it will return a 401 UNAUTHORIZED, both having a content JSON object containing an error key and explanation ({ error : "Token invalid" } for example).
URL Params might state :username & :password, that will convert to a structure like /[Path]]?[Param]=:[Param]&[Param_2]=:[Param_2], converted to a call of /signup?username=:username&password=:password;
| Title | Sign Up |
|---|---|
| Path | /signup |
| Method | POST |
| URL Params | Required: :username & :password |
| Optional: N/A | |
| Body Params | N/A |
| Response | { token: "V87ttvUY0B976rvr" } |
| Notes | N/A |
Devices
| Title | Add Device |
|---|---|
| Path | /device |
| Method | POST |
| URL Params | Required: :broker, :topic & :type |
Optional: :name, :username & :password | |
| Body Params | username=[text], token=[text] |
| Response | { id: "" } |
| Notes | :name = "Garage"?, :type = "pub" or "sub" & :username / :password refers to the location/broker you use |
| Title | Update Device |
|---|---|
| Path | /device |
| Method | UPDATE |
| URL Params | Required: :id |
Optional: :broker, :topic, :type, :name, :username & :password | |
| Body Params | username=[text], token=[text] |
| Response | |
| Notes |
| Title | Remove Device |
|---|---|
| Path | /device |
| Method | DELETE |
| URL Params | Required: :id |
| Optional: N/A | |
| Body Params | username=[text], token=[text] |
| Response | |
| Notes |
Tags
| Title | Add Tag |
|---|---|
| Path | /tag |
| Method | POST |
| URL Params | Required: :device_id, :type & :value |
| Optional: N/A | |
| Body Params | username=[text], token=[text] |
| Response | { id: [text] } |
| Notes | :type = "Tag" or "User", then :value being of that |
| Title | Update Tag |
|---|---|
| Path | /tag |
| Method | UPDATE |
| URL Params | Required: :id |
Optional: :device_id, :type & :value | |
| Body Params | username=[text], token=[text] |
| Response | |
| Notes |
| Title | Remove Tag |
|---|---|
| Path | /tag |
| Method | DELETE |
| URL Params | Required: :id |
| Optional: N/A | |
| Body Params | username=[text], token=[text] |
| Response | |
| Notes |
Others
| Title | Get Logs |
|---|---|
| Path | /logs |
| Method | GET |
| URL Params | Required: N/A |
| Optional: N/A | |
| Body Params | username=[text], token=[text] |
| Response | [{ id: [text], type: [text], value: [text], accessed: [bool], timestamp: [time] }, ...] |
| Notes |
Server Setup
Having this rough plan it's now time to set up the routes and testing, using a variety of npm packages to help debug and function, morgan being an example to view api calls via the debugger, then express and body-parser to set up the server and get data from Postman (another debugging tool to test API End-points).
For this I will be following along with a YouTube Playlist by Academind called Building a RESTful API with Node.js and modifying the tutorial as it goes along to part six (where it moves onto the database).
MQTT - 6th Nov' 2018
After finishing the routes needed documented in the API end-points, I thought I would try and use an implementation of mqtt for NodeJS, being a package just called mqtt in npm (node package manager).
For this I will be using the following tutorial as a reference, the api for the npm package is well documented, although the tutorial goes more in depth and does use the hivemq broker as an example, instead of mosquitto.
The first challenge I have faced is where to locate the connection of the mqtt devices added by the user, in the app.js file, device route, for now I think creating anonymous functions that will connect to topics in the device route, which will be pushed into an array, it might work.
7th Nov' 2018

Theoretically I thought this should work, but it does not, this seems to be due to the fact the route is only exported and will not persist variables. Looking at a tutorial called "Write a very simple IoT API using ExpressJS and MQTT" it makes sense to create a wrapper class which I can then use to create an instance of a client, I think my next step is to try this and have the array of connections in the app instead.
After a bit of testing and trying to hard code the values I was using with Postman via the following lines below, I still had issues, after a bit of time I noticed on the broker that the topic I was trying to subscribe to has a '/' at the beginning... After I added that it worked, damn it, although I will still have to work out how to interact with the subscriber, maybe grabbing the broker and topic from the database, it should work.
const mqtt = require('mqtt');
const testClient = mqtt.connect('mqtt://broker.hivemq.com');
testClient.on('connect', () => { testClient.subscribe('lamp3/status') });
testClient.on('message', (topic, message) => { console.log(message.toString()); });
I implemented this as a function within my device route (api end-point), passing in the parameters (technically the query property of the request) to listen on a topic, after using the same slightly modified called from Postman earlier, but changing the topic to /lamp3/status, which worked.
Now I know this works I should implement the database now, using the table fields I defined earlier on as mongoose schemas.
MongoDB
Following along from the same tutorial playlist for the server setup, I will be watching the "MongoDB and Mongoose | Creating a REST API with Node.js" video as a guide to setup my database.
I will also add more properties to my user since, thanks to James Davenport from Free Code Camp Manchester, I have been made aware of an alternative mean via a node package on npm, node-pushnotifications, that will send push notifications to a users device (hopefully).
Re-design (19th Nov' 2018)
Due to time constrains of the whole assignment being due in three weeks time (9th December), as well as having other units to attend to and other events (with needed rest to prevent burnout), I am restructuring my approach to simply development, my first step was to revisit my diagram and change it accordingly.

Here we see less interaction directly to the server and it being subscribed to the topic (singular now), rather the phone being subscribed/publishing to it instead to enable push notifications, this is a rough plan so a sequence diagram is needed to refine the interactions.

From here I noticed that the RFID client would be getting back a response from the server then having to forward it on to the broker topic, as well as later on the phone would also have to publish to the server (to insert a log), as well as publish to the broker topic to unlock the door (turn the servo).
Due to this I have redesigned how the interactions work, making the server publish to the required topic (which should be given in the new API Calls I will create), this will decrease the amount of calls needed and in turn hopefully decresing the likelyhood of any errors occuring.
